How to Photograph Manchester Trams at Blue Hour – Camera Settings, Locations & Tips
Manchester’s iconic Metrolink trams are some of my favourite subjects to photograph, particularly during blue hour when the city lights begin to glow against the deep blue evening sky.
From the historic architecture surrounding Manchester Central (formerly GMEX) to the impressive buildings of St Peter’s Square, the city offers fantastic opportunities for tram photography, long exposures and atmospheric urban scenes.
As a Manchester-based photographer specialising in cityscape and night photography, I’ve spent countless evenings capturing the city’s trams in different lighting conditions. In this guide, I’ll share my favourite locations, recommended camera settings and practical tips to help you photograph Manchester’s trams at blue hour and after dark.
Whether you’re a beginner looking to improve your photography or an enthusiast wanting to experiment with long exposures and light trails, these techniques will help you capture more creative images of Manchester.
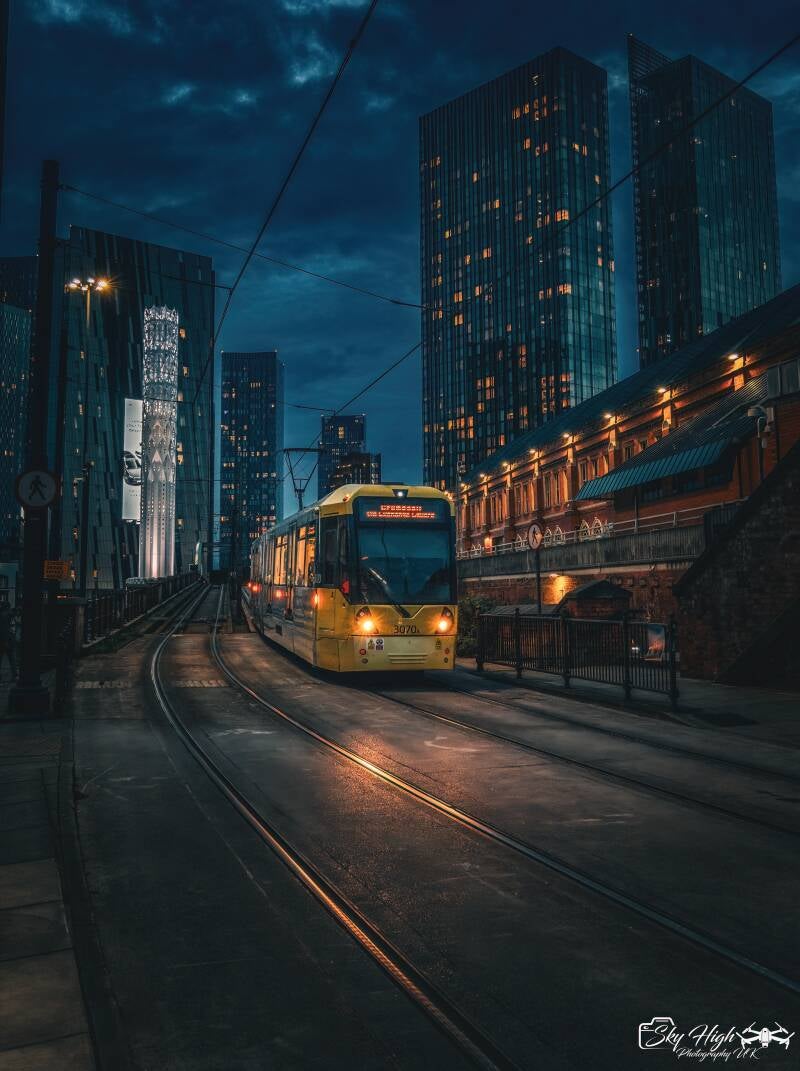
Why Blue Hour Is the Best Time to Photograph Manchester Trams
Blue hour is one of my favourite times to photograph Manchester. It occurs during twilight, when the sun is below the horizon and the sky takes on beautiful shades of blue.
As the natural light fades, Manchester’s streetlights, illuminated buildings and Metrolink trams begin to stand out against the evening sky, creating a wonderful balance between natural and artificial light.
Photographing during blue hour also allows you to retain detail in the surrounding architecture rather than having large areas disappear into darkness.
For tram photography, this is particularly effective. The yellow Metrolink trams contrast beautifully with the cool blue tones of the sky, while their headlights, illuminated windows and reflections add warmth to the scene.
My top tip: Arrive at your chosen location before sunset and continue shooting as the light changes. Some of the best photographs happen during the transition from blue hour into full darkness, when the city lights become increasingly prominent.
Best Locations to Photograph Manchester Trams at Blue Hour
Manchester Central (GMEX)
One of my favourite locations for photographing Manchester’s Metrolink trams is outside Manchester Central, formerly known as the GMEX exhibition centre.
The building’s distinctive curved roof, historic architecture and surrounding tram tracks provide a fantastic backdrop for cityscape photography.
I particularly enjoy shooting here during blue hour, when the illuminated building contrasts with the deep blue evening sky.
The curved tram tracks create natural leading lines that draw the viewer through the composition, while approaching trams introduce movement and colour.
Photography tip: Try positioning yourself so the tracks lead towards Manchester Central. Experiment with different shutter speeds to capture either a sharp approaching tram or creative motion blur.
Always remain in safe pedestrian areas and never stand on the tram tracks to get a photograph.
St Peter’s Square
St Peter’s Square is another of Manchester’s best locations for tram photography, offering a wonderful combination of historic architecture, modern buildings and regular Metrolink services.
Manchester Central Library provides an instantly recognisable backdrop, while the surrounding streets and tram lines offer plenty of opportunities to experiment with composition.
Although blue hour is particularly beautiful here, I also enjoy photographing the square after dark, when the illuminated buildings, tram lights and surrounding streetlights create a completely different atmosphere.
Photography tip: Look for compositions that combine the passing trams with Manchester Central Library. A tripod and slower shutter speed can help you capture movement while keeping the surrounding architecture sharp.
Remember to leave plenty of room for pedestrians and passengers when setting up your camera.

Best Camera Settings for Photographing Manchester Trams
The best camera settings for photographing Manchester’s Metrolink trams depend on the effect you’re trying to achieve.
Sometimes I want to capture a tram perfectly sharp against the surrounding architecture. Other times, I prefer using a slower shutter speed to introduce movement and create a more atmospheric cityscape.
Here are some useful starting settings.
1. Freezing a Moving Tram
If you want the tram to appear sharp, try:
- Shutter speed: 1/250 second or faster
- Aperture: f/4 to f/5.6
- ISO: Adjust according to available light
- Focus: Continuous autofocus
These settings are particularly useful earlier in blue hour, when there’s still enough ambient light to maintain a reasonably fast shutter speed.
2. Capturing Motion Blur
To introduce movement while keeping the buildings sharp, try:
- Shutter speed: 1/4 to 1 second
- Aperture: f/8
- ISO: 100–400
- Tripod: Recommended
As the tram moves through your composition, the slower shutter speed creates motion blur while the stationary architecture remains sharp.
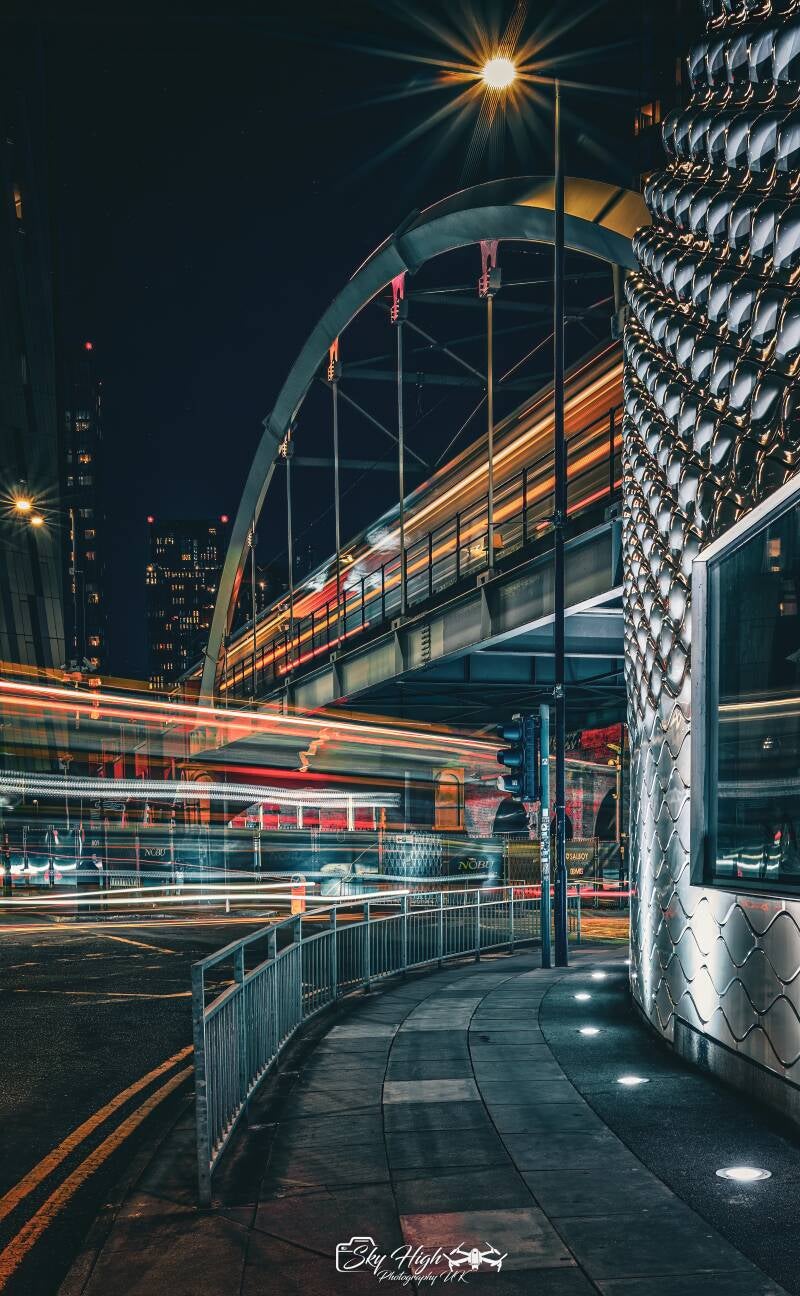
3. Creating Tram Light Trails
For more dramatic long exposures, start with:
- Shutter speed: 2–5 seconds
- Aperture: f/8 to f/11
- ISO: 100
- Tripod: Essential for consistently sharp backgrounds
Long exposures can transform moving trams into colourful streaks of light, particularly when their illuminated windows and headlights move through the scene.
However, longer exposures aren’t always better. Bright headlights and streetlights can easily become overexposed, so check your histogram and adjust accordingly.
My top tip: Experiment with several shutter speeds at the same location. A photograph taken at 1/250 second can look completely different from one captured at 2 seconds, even when the composition remains unchanged.
Composition Tips for Photographing Manchester Trams
Getting your camera settings right is important, but a strong composition can make the difference between an ordinary photograph and something really special.
When photographing Manchester’s trams, I try to think about the entire scene rather than concentrating solely on the tram itself.
Use Leading Lines
Manchester’s tram tracks provide fantastic natural leading lines. I often use their curves to guide the viewer’s eye towards the main subject, particularly around Manchester Central and St Peter’s Square.
Include Recognisable Architecture
One of the things I love about photographing Manchester is the contrast between its historic buildings and modern developments.
Including landmarks such as Manchester Central or Central Library helps give your images a strong sense of place.
Be Patient With Tram Positioning
Sometimes a tram arriving just a few seconds earlier or later can completely change a composition.
I often wait for the right moment, watching how the tram moves through the scene and how its position relates to the buildings behind it.
Look for Reflections
After rain, Manchester’s pavements can reflect tram lights, illuminated buildings and the colours of the evening sky.
These reflections add depth and atmosphere, particularly during blue hour.
Experiment With Different Perspectives
Try photographing from a lower viewpoint to emphasise leading lines, or step back to include more of the surrounding architecture.
Small changes in camera position can make a big difference to the final photograph, but always stay in safe pedestrian areas and clear of the tram tracks.
My top tip: Before taking your photograph, look around the edges of your composition. Removing distracting elements and keeping your framing clean can make your subject stand out much more effectively.
Editing Blue Hour Tram Photographs in Lightroom
Editing plays an important role in bringing out the atmosphere of a blue-hour photograph, but I always try to retain the natural character of the scene.
When editing my Manchester tram photographs in Adobe Lightroom Classic, I concentrate on balancing the artificial lights with the remaining colour in the evening sky.
1. Protect the Highlights
Tram headlights, streetlights and illuminated signs can be extremely bright compared with the surrounding buildings.
I usually begin by checking the highlights and adjusting exposure where necessary to avoid losing too much detail in the brightest areas.
2. Bring Out the Blue-Hour Sky
One of my favourite parts of photographing Manchester at blue hour is the contrast between the cool blue sky and the warmer city lights.
Careful white balance adjustments can help preserve this contrast without making the overall photograph look unnatural.
3. Balance Shadows and Contrast
I often make subtle adjustments to the shadows to reveal details in Manchester’s architecture while retaining the depth and atmosphere of the evening.
The aim isn’t to brighten every shadow, but to create a balanced photograph with a natural sense of light.
4. Use Masks for Local Adjustments
Lightroom’s masking tools are particularly useful for adjusting specific areas of an image.
For example, I might subtly enhance the sky, balance the brightness of a building or reduce distracting highlights without affecting the entire photograph.
5. Combining Light Trails in Photoshop
Sometimes a single exposure doesn’t capture the exact movement I’m looking for.
In these situations, I may combine several photographs taken from the same tripod position using layers in Adobe Photoshop.
The Lighten blending mode can be useful for combining selected light trails, although it’s important to control overly bright areas to keep the final photograph balanced.
My top tip: Keep your editing consistent with the atmosphere you experienced while taking the photograph. A well-balanced blue-hour image doesn’t need excessive saturation or contrast to make an impact.
Learn Manchester Night Photography With Me
Would you like to learn how to capture Manchester’s iconic trams, beautiful blue-hour skies and creative light trails yourself?
I offer private one-to-one Manchester Night Photography Workshops, providing hands-on photography tuition in some of the city’s most photogenic locations.
Whether you’re a complete beginner or looking to improve your existing skills, I’ll guide you through camera settings, long exposures, composition and techniques for photographing Manchester after dark.
During our sessions, we’ll explore how to make the most of changing light, capture moving trams and create atmospheric cityscape photographs.
Every workshop is tailored to your experience, equipment and photography goals.
More Manchester Photography Tips and Guides
Manchester offers endless opportunities for photography, from its iconic trams and historic architecture to atmospheric canals, reflections and illuminated cityscapes.
If you’ve enjoyed this guide and would like to explore more photography techniques, take a look atmy complete guide to photographing Manchester at night.
It covers long exposures, camera settings, cityscape composition and some of my favourite locations for capturing Manchester after dark.